Temperature monitoring in Homeseer with Dallas 1 Wire
Dallas 1 wire as the name tries to suggest is a bus network that runs on a single
wire - well that would be impossible, In reality you need at least two wires- namely
5 volts and the data signal - the device will work “parasitically” I.e. It draws
its ground signal from the databus. Given I have plenty of wires available in a
CAT6 cable, I decided I would supply 5v, data and ground.
Update 2015: For Homeseer 3 - I’ve replaced all this complexity with a Midon TEMP08
- which is simple and reliable.
The exciting thing about 1-wire is that there’s a vast array of sensors and devices
that you can plug into your one-wire bus - which for the home automation hobbyist
are really useful. Some examples of what devices you can add to a 1-wire network.
Even without home automation software, if you just download the driver package for
the USB adapter, it comes with a little Java application that will graph the temperature
of all the 1-wire sensors it finds - so a easy first step to ensure things are working
correctly.
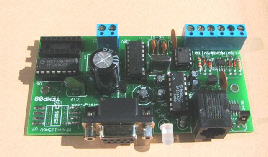
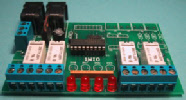
The “official” and supposedly most stable way of running 1-wire sensors via Homeseer
is to use a a “TEMP08” controller from Midon design shown on the left according to
the blurb it “offloads” critical timing from the PC.
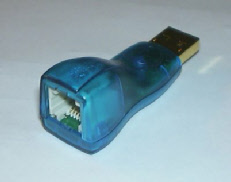
On the right is the Dallas DS9490 USB 1-wire adapter, which I’m currently using via
MCSXAP - so far it seems stable.
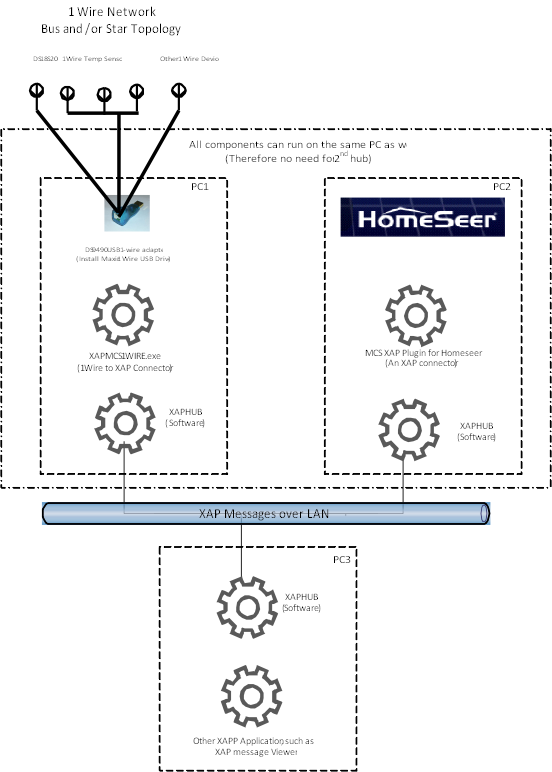
1 Wire, XAP into Homeseer Block diagram
On the left hand side you have the Dallas 9490 USB adapter, which interfaces to the
XAP protocol via a connector (XAPMCS1WIRE.exe).
The connector talks to the HUB software on the host which places the messages onto
the XAP network which runs over TCP/IP on UDP port 3639.
Then there is homeseer plugin (MCSXAP) which interfaces between homeseer and the
XAP network
Each host requires a HUB, but a single host can have multiple XAP connectors running
on it - therefore you can install the USB Adapter, the connector, the HUB and Homeseer
plugin onto the same machine.
The XAP message viewer is a very handy tool as it allows you to sniff the XAP messages
on your network for troubleshooting and to work out the format of a message in order
to create an event or action.
To get started you want a DS9490 1-Wire USB Adapter and a few DS18S20 temperature
sensors. On my first attempts with 1 wire, I tried using an old Homeseer plugin for
the DS9490 which requires Microsoft Java, which on new PC’s such as XP and Windows
7 involves deliberately installing the old and obsolete Microsoft Java - which at
least in my case resulted in a PC that kept crashing - which was totally unacceptable.
Michael McSharry has written a connector for the Dallas DS9490 USB adapter for the
XAP protocol (which is another home automation protocol) along with a XAP plugin
for Homeseer.
So you are converting 1-Wire messages into XAP messages which are then processed
via the Homeseer XAP plugin, which is slightly convoluted but at least it works,
plus it opens up a whole world of interfacing options with XAP which seems pretty
popular as well (plus it runs over ethernet)
XAP is quite simple, each host on the network requires a “HUB” which is just a piece
of software that sends and receives messages onto XAP network over UDP port 3639
Each host can have multiple XAP devices attached - they all talk with a “connector”
to the HUB. So in my case I have the DS9490 XAP Driver, The XAP HUB and the XAP
homeseer plugin all running on my Homeseer PC.
You can also get an XAP message viewer - which listens for XAP messages passing by
on the network (A sniffer if you like) - this is very handy for ensuring your network
is working and also for inspecting the XAP messages and creating events in Homeseer.
(For example I have events that send me an email if any of my sensors havent’ sent
any updates for a while)
A good installation guide and explanation of XAP has been written by Bob Funke “mcs
xAP Application Installation Guide” which can be found in post #3 of this discussion
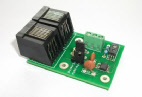
On the left, Humidity and IO modules from Sheepwalk electronics in the UK.
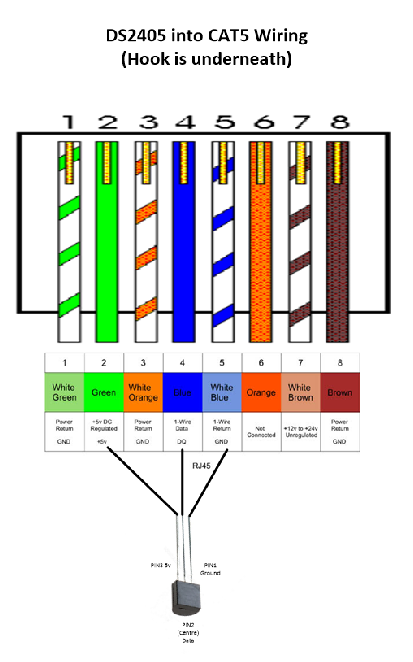
There’s very little involved in doing this - as each sensor only needs 5v, Ground
and Data. However I’ve followed the recognised standard for pin assignments.
In theory you can run 1-Wire over anything - I originally started using alarm cable,
but it didn’t seem particularly reliable. My house is flooded with CAT6 and I’m running
9 sensors in a star layout. Each run is probably in the order of 15-20 meters with
the longest being 45 meters so far.
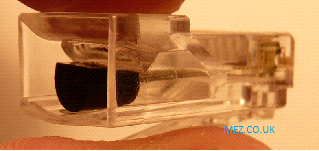
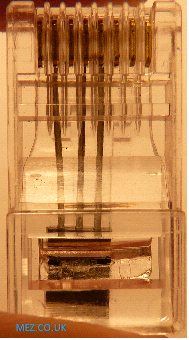
I discovered that it was possible to crimp the TO-92 package directly into an RJ45
connector - which makes for a very quick and simple pluggable temperature probe that
you can add to any room that has a CAT5/6 socket on the wall.
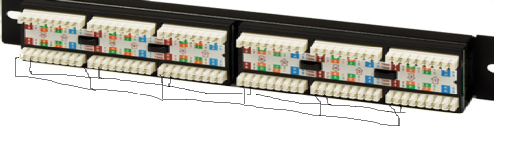
I made a 1-Wire patch panel - using a standard cat5 panel and simply running a piece
of cat5 cable between all the connectors to connect them all together in parallel
to create a bus.
This is totally incompatible with ethernet - we are just using the CAT6 cable as
an electrical connection - do not plug any computer equipment into these sockets.
Close up of a Dallas 1 Wire DS18S20 crimped into a std RJ45 socket.